Glad to see you’re getting started with our pattern Florence!
With this pattern, you’ll make a nice, summer wrap dress that’s just as great to wear in your free time as on a day at work! Florence is a loose-fitting, mid-length dress that is tied together with a belt. The collar with lapel and the drop shoulders with folded sleeve trims give the dress a modern and easygoing look. You can make Florence in a pretty print, but she will look just as gorgeous in a plain fabric. Or why not shorten her to a lovely wrap blouse!
Happy sewing!
Finish the shoulder seams with an overlock or by zigzagging.
Place both fronts on the back, right sides of the fabric together and stitch the shoulder and side seams. Press the shoulder seams open.


Trim the rounded side seam under the arm. Finish the side seams together with an overlock or by zigzagging. Press the seam towards the front.


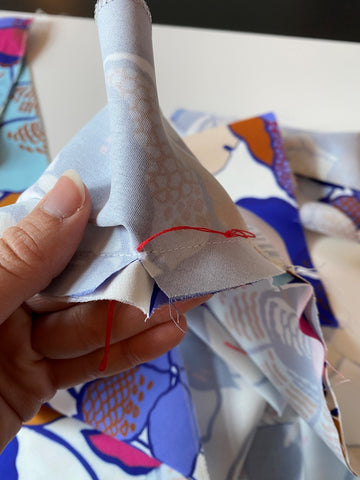
The under collar is the piece without the interfacing. The shortest of the long sides of the collar is the neckline. Pin the under collar to the lapel of the front, right sides together. The markings of the collar and lapel need to match exactly. Start stitching in the first marking, at 1,5 cm from the edge of the collar, until the next marking at the corner of the collar.

Leave your needle in the fabric and raise your presser foot. Snip into the seam allowance of the front just until the end of your stitching (where your needle is). You basically snip the corner of the front where the lapel passes into the neckline.

Turn the piece and pin the neckline until the next basting thread. Make sure that the markings at the shoulder seams and middle back match. The first basting thread on the other side of the collar corresponds with that one of the lapel. Lower your presser foot and stitch the neckline to the next basting thread.

Leave your needle in the fabric again, raise the presser foot and snip into the seam allowance of the front just until your stitching (where your needle is). Turn the piece under your sewing machine. Pin the last part of the collar to the lapel. Lower your presser foot and stitch until the last basting thread (at 1,5 cm from the edge of the under collar).

Press the seam allowance open. Snip into the seam allowance of the front and cut notches in the seam allowance of the under collar.

Finish the shoulder seams of front and back facing with an overlock or by zigzagging. Stitch the shoulder seams of the facing, right sides together. Press open. Finish the outer raw edge with an overlock or by zigzagging. Stitch the upper collar to the facing in the same way you stitched the under collar to the dress.


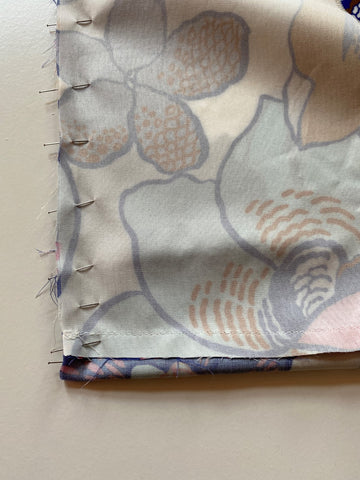
Place the facing on the dress, right sides together and pin the hem of the facing to the hem of the front. Stitch in place at 1 cm parallel to the hem. Press the seam allowances downwards.

Pin the facing and the upper collar to the dress and the under collar, right sides together. You’ll notice that the facing pulls the hem of the front 2 cm upwards. This way we can neatly finish the corner of the hem.


Also, add the little ribbon between the left front facing and the left front at the marking, so you can stitch it along. The end of the ribbon is aligned with the seams of facing and front.

Start at the hem of the dress and stitch until the first marking of the collar and lapel (this is the first corner of lapel and collar). Make sure that the seam allowance of the collar is out of the way so you don’t stitch in it.

Now stitch the under collar to the upper collar. Start where you ended in the previous step and make sure again that the seam allowances are out of the way. Stitch the collar all around to the next marking at the next corner. Make sure you always begin and end in the markings.

Fold the seam allowance out of the way and stitch the last part of the front to the facing until the hem.
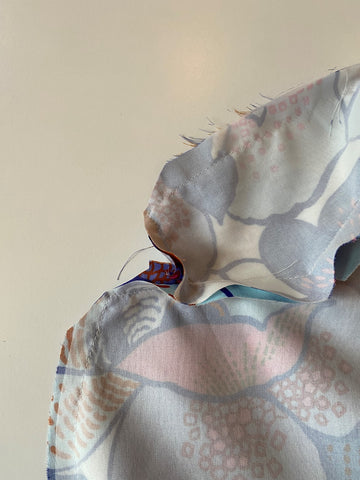
Snip into the seam allowance of the outside seam of the collar and trim the corners of the collar, lapel and the bottom of the hem. Finish the seams of facing and front together with an overlock or by zigzagging. Turn the collar to the right side and push out the corners. The raw edge of the collar is difficult to finish. If your fabric frays a lot, try to finish it anyway.
Stitch the seam allowance of the front and facing to the facing at 2 mm from the seam. Start as close as possible to the hem and stitch until the marking. Press nicely flat.

Handstitch the neckline of upper and under collar together, from shoulder to shoulder. Handstitch the shoulder seams of the facing and dress together.
Press 1 cm of the hem of the dress to the wrong side of the fabric. Now press another 2 cm of the hem to the wrong side. Stitch the hem all around, including the front facing pieces.

Put both parts of the sleeve trim with the right sides of the fabric together. Pin the longest side together and stitch.

Press the seam allowance towards the inside part of the sleeve trim and stitch the seam allowance to this part at 2 mm from the stitching line.
Now fold the sleeve trim in two widthwise with the right sides together, so both short sides lay together. Pin and stitch. Press the seam open.

Double fold the sleeve trim lengthwise with the wrong sides together and press. Do the same for the other sleeve trim.

The four parts of the sleeve trim are identical. When making the first sleeve trim, choose which side will be the inside part. Make sure the second sleeve trim is the mirror image of the first one.
Pin the sleeve trim with both layers at the armhole, the inside sleeve trim is on the right side of the fabric. Make sure the markings match. Stitch and overlock or zigzag all seam allowances together.

Now fold over the sleeve trim and stitch the seam allowance of the sleeve trim to the front, just next to your stitching line.
Fold the sleeve trim back up in its place and press flat. Handstitch it to the front at the shoulder seam and underarm.

Place both parts of the belt with the right sides of the fabric together and stitch one short side. Press the seam open. Double fold the belt lengthwise with the right sides of the fabric together and stitch all sides but leave an opening of about 5 cm in the middle to turn it.

Trim the corners of the short sides and turn the belt to the right side. Close the opening by sewing by hand and press.


Finish the raw edge of the end of the ribbon. Sew the press buttons at the indicated markings on the front, the facing, in the side seam and at the end of the ribbon.
We wish you a lot of fun with your new dress! Don't forget to share your creation on Instagram with #florencedress!